Responsive Registration Form Using HTML and CSS
If you’re eager to craft a responsive Registration Form using basic HTML and CSS, you’ve come to the right place!
This blog will guide you through the process of creating a Responsive Registration Form in HTML and CSS. Whether you’re just starting out or have a basic understanding of HTML and CSS, you’ll find this tutorial easy to follow.
A Registration Form is a crucial component of any website or application, where users must input their details such as name, email, address, and more.
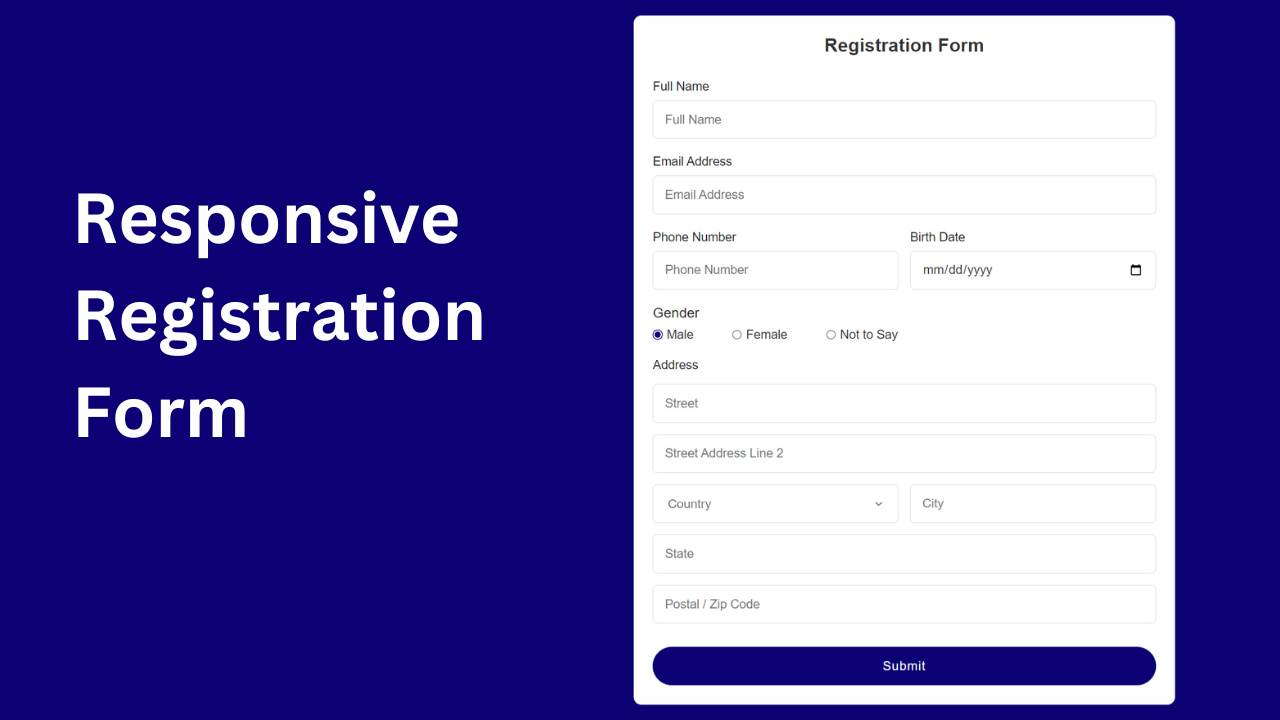
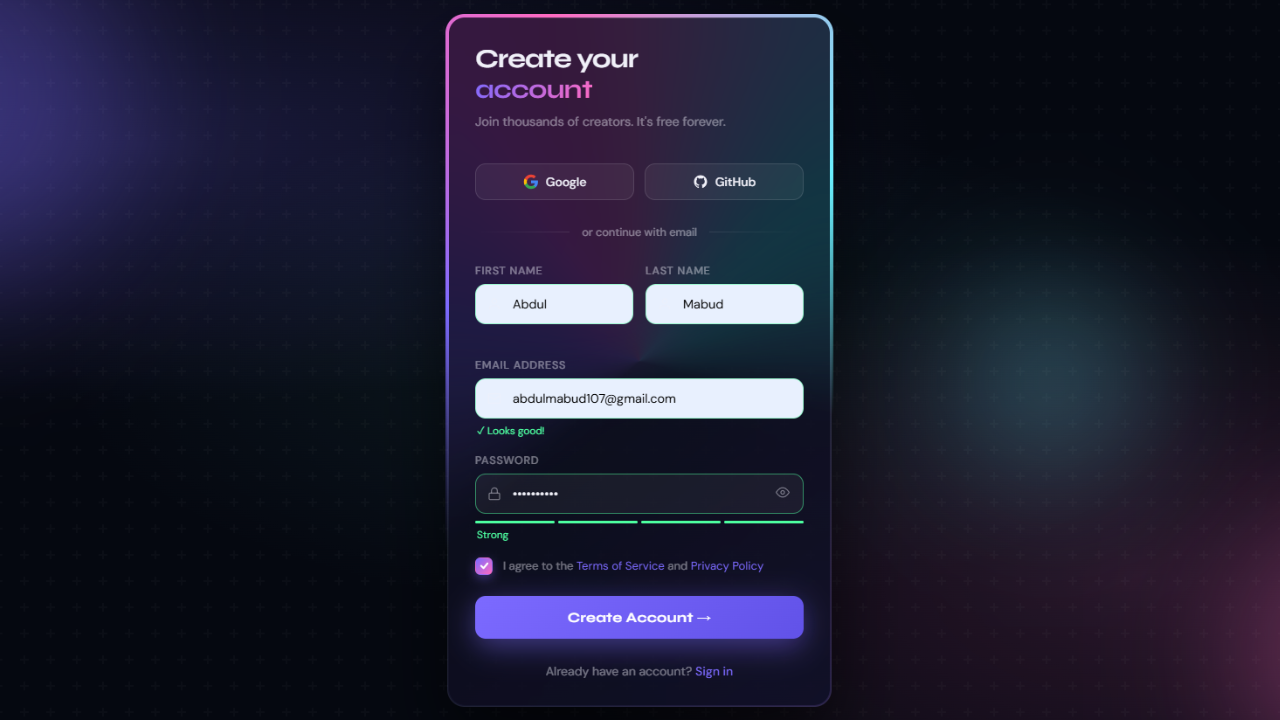
Take a peek at the preview of the Registration Form you’ll learn to create in this blog. You’ll notice essential input fields every Registration Form should include, along with radio buttons for selection and a submit button.
If you’re keen to see the live demo of this Registration Form and explore all the HTML and CSS codes used to build it, check out the video tutorial below.
Registration Form Using HTML and CSS (Source Code)
Let’s walk through the steps to build a registration form using HTML and CSS:
- Begin by creating a folder for your project. You’re free to name this folder as you wish. Inside this folder, we’ll create the necessary files.
- Create a new file named index.html. The file name must be “index” with the extension “.html”.
- Next, create another file named style.css. Again, ensure the file name is “style” with the extension “.css”.
After you’ve set up your project folders, simply copy and paste the provided code snippets into their respective files. If you prefer not to do this manually, you can quickly download the HTML and CSS files for the registration form by clicking the download button below.
First, Copy the bellow HTML code and paste the codes into your index.html file.
					<!DOCTYPE html>
<html lang="en">
<head>
    <meta charset="UTF-8">
    <meta name="viewport" content="width=device-width, initial-scale=1.0">
    <title>Registration Form</title>

    <link rel="stylesheet" href="style.css">
</head>
<body>
    <div class="container">
        <h2>Registration Form</h2>
        <form action="#" class="form">
            <div class="input-box">
                <label>Full Name</label>
                <input type="text" placeholder="Full Name" required>
            </div>
            <div class="input-box">
                <label>Email Address</label>
                <input type="email" placeholder="Email Address" required>
            </div>
            <div class="column">
                <div class="input-box">
                    <label>Phone Number</label>
                    <input type="tel" placeholder="Phone Number" required>
                </div>
                <div class="input-box">
                    <label>Birth Date</label>
                    <input type="date" required>
                </div>
            </div>
            <div class="gender-box">
                <h3>Gender</h3>
                <div class="gender-option">
                    <div class="gender">
                        <input type="radio" id="check-male" name="gender" checked>
                        <label for="check-male">Male</label>
                    </div>
                    <div class="gender">
                        <input type="radio" id="check-female" name="gender">
                        <label for="check-female">Female</label>
                    </div>
                    <div class="gender">
                        <input type="radio" id="check-other" name="gender">
                        <label for="check-other">Not to Say</label>
                    </div>
                </div>
            </div>
            <div class="input-box address">
                <label> Address</label>
                <input type="text" placeholder="Street" required>
                <input type="text" placeholder="Street Address Line 2" required>
                <div class="column">
                    <div class="select-box">
                        <select>
                            <option hidden>Country</option>
                            <option>Bangladesh</option>
                            <option>India</option>
                            <option>United States</option>
                            <option>United Kingdom</option>
                        </select>
                    </div>
                    <input type="text" placeholder="City" required>
                </div>
                <div class="colimn">
                    <input type="text" placeholder="State" required>
                    <input type="text" placeholder="Postal / Zip Code" required>
                </div>
            </div>
            <button>Submit</button>
        <input
                    class="apbct_special_field apbct_email_id__elementor_form"
                    name="apbct__email_id__elementor_form"
                    aria-label="apbct__label_id__elementor_form"
                    type="text" size="30" maxlength="200" autocomplete="off"
                    value=""
                /></form>
    </div> <script data-no-optimize="1">window.lazyLoadOptions=Object.assign({},{threshold:300},window.lazyLoadOptions||{});!function(t,e){"object"==typeof exports&&"undefined"!=typeof module?module.exports=e():"function"==typeof define&&define.amd?define(e):(t="undefined"!=typeof globalThis?globalThis:t||self).LazyLoad=e()}(this,function(){"use strict";function e(){return(e=Object.assign||function(t){for(var e=1;e<arguments.length;e++){var n,a=arguments[e];for(n in a)Object.prototype.hasOwnProperty.call(a,n)&&(t[n]=a[n])}return t}).apply(this,arguments)}function o(t){return e({},at,t)}function l(t,e){return t.getAttribute(gt+e)}function c(t){return l(t,vt)}function s(t,e){return function(t,e,n){e=gt+e;null!==n?t.setAttribute(e,n):t.removeAttribute(e)}(t,vt,e)}function i(t){return s(t,null),0}function r(t){return null===c(t)}function u(t){return c(t)===_t}function d(t,e,n,a){t&&(void 0===a?void 0===n?t(e):t(e,n):t(e,n,a))}function f(t,e){et?t.classList.add(e):t.className+=(t.className?" ":"")+e}function _(t,e){et?t.classList.remove(e):t.className=t.className.replace(new RegExp("(^|\\s+)"+e+"(\\s+|$)")," ").replace(/^\s+/,"").replace(/\s+$/,"")}function g(t){return t.llTempImage}function v(t,e){!e||(e=e._observer)&&e.unobserve(t)}function b(t,e){t&&(t.loadingCount+=e)}function p(t,e){t&&(t.toLoadCount=e)}function n(t){for(var e,n=[],a=0;e=t.children[a];a+=1)"SOURCE"===e.tagName&&n.push(e);return n}function h(t,e){(t=t.parentNode)&&"PICTURE"===t.tagName&&n(t).forEach(e)}function a(t,e){n(t).forEach(e)}function m(t){return!!t[lt]}function E(t){return t[lt]}function I(t){return delete t[lt]}function y(e,t){var n;m(e)||(n={},t.forEach(function(t){n[t]=e.getAttribute(t)}),e[lt]=n)}function L(a,t){var o;m(a)&&(o=E(a),t.forEach(function(t){var e,n;e=a,(t=o[n=t])?e.setAttribute(n,t):e.removeAttribute(n)}))}function k(t,e,n){f(t,e.class_loading),s(t,st),n&&(b(n,1),d(e.callback_loading,t,n))}function A(t,e,n){n&&t.setAttribute(e,n)}function O(t,e){A(t,rt,l(t,e.data_sizes)),A(t,it,l(t,e.data_srcset)),A(t,ot,l(t,e.data_src))}function w(t,e,n){var a=l(t,e.data_bg_multi),o=l(t,e.data_bg_multi_hidpi);(a=nt&&o?o:a)&&(t.style.backgroundImage=a,n=n,f(t=t,(e=e).class_applied),s(t,dt),n&&(e.unobserve_completed&&v(t,e),d(e.callback_applied,t,n)))}function x(t,e){!e||0<e.loadingCount||0<e.toLoadCount||d(t.callback_finish,e)}function M(t,e,n){t.addEventListener(e,n),t.llEvLisnrs[e]=n}function N(t){return!!t.llEvLisnrs}function z(t){if(N(t)){var e,n,a=t.llEvLisnrs;for(e in a){var o=a[e];n=e,o=o,t.removeEventListener(n,o)}delete t.llEvLisnrs}}function C(t,e,n){var a;delete t.llTempImage,b(n,-1),(a=n)&&--a.toLoadCount,_(t,e.class_loading),e.unobserve_completed&&v(t,n)}function R(i,r,c){var l=g(i)||i;N(l)||function(t,e,n){N(t)||(t.llEvLisnrs={});var a="VIDEO"===t.tagName?"loadeddata":"load";M(t,a,e),M(t,"error",n)}(l,function(t){var e,n,a,o;n=r,a=c,o=u(e=i),C(e,n,a),f(e,n.class_loaded),s(e,ut),d(n.callback_loaded,e,a),o||x(n,a),z(l)},function(t){var e,n,a,o;n=r,a=c,o=u(e=i),C(e,n,a),f(e,n.class_error),s(e,ft),d(n.callback_error,e,a),o||x(n,a),z(l)})}function T(t,e,n){var a,o,i,r,c;t.llTempImage=document.createElement("IMG"),R(t,e,n),m(c=t)||(c[lt]={backgroundImage:c.style.backgroundImage}),i=n,r=l(a=t,(o=e).data_bg),c=l(a,o.data_bg_hidpi),(r=nt&&c?c:r)&&(a.style.backgroundImage='url("'.concat(r,'")'),g(a).setAttribute(ot,r),k(a,o,i)),w(t,e,n)}function G(t,e,n){var a;R(t,e,n),a=e,e=n,(t=Et[(n=t).tagName])&&(t(n,a),k(n,a,e))}function D(t,e,n){var a;a=t,(-1<It.indexOf(a.tagName)?G:T)(t,e,n)}function S(t,e,n){var a;t.setAttribute("loading","lazy"),R(t,e,n),a=e,(e=Et[(n=t).tagName])&&e(n,a),s(t,_t)}function V(t){t.removeAttribute(ot),t.removeAttribute(it),t.removeAttribute(rt)}function j(t){h(t,function(t){L(t,mt)}),L(t,mt)}function F(t){var e;(e=yt[t.tagName])?e(t):m(e=t)&&(t=E(e),e.style.backgroundImage=t.backgroundImage)}function P(t,e){var n;F(t),n=e,r(e=t)||u(e)||(_(e,n.class_entered),_(e,n.class_exited),_(e,n.class_applied),_(e,n.class_loading),_(e,n.class_loaded),_(e,n.class_error)),i(t),I(t)}function U(t,e,n,a){var o;n.cancel_on_exit&&(c(t)!==st||"IMG"===t.tagName&&(z(t),h(o=t,function(t){V(t)}),V(o),j(t),_(t,n.class_loading),b(a,-1),i(t),d(n.callback_cancel,t,e,a)))}function $(t,e,n,a){var o,i,r=(i=t,0<=bt.indexOf(c(i)));s(t,"entered"),f(t,n.class_entered),_(t,n.class_exited),o=t,i=a,n.unobserve_entered&&v(o,i),d(n.callback_enter,t,e,a),r||D(t,n,a)}function q(t){return t.use_native&&"loading"in HTMLImageElement.prototype}function H(t,o,i){t.forEach(function(t){return(a=t).isIntersecting||0<a.intersectionRatio?$(t.target,t,o,i):(e=t.target,n=t,a=o,t=i,void(r(e)||(f(e,a.class_exited),U(e,n,a,t),d(a.callback_exit,e,n,t))));var e,n,a})}function B(e,n){var t;tt&&!q(e)&&(n._observer=new IntersectionObserver(function(t){H(t,e,n)},{root:(t=e).container===document?null:t.container,rootMargin:t.thresholds||t.threshold+"px"}))}function J(t){return Array.prototype.slice.call(t)}function K(t){return t.container.querySelectorAll(t.elements_selector)}function Q(t){return c(t)===ft}function W(t,e){return e=t||K(e),J(e).filter(r)}function X(e,t){var n;(n=K(e),J(n).filter(Q)).forEach(function(t){_(t,e.class_error),i(t)}),t.update()}function t(t,e){var n,a,t=o(t);this._settings=t,this.loadingCount=0,B(t,this),n=t,a=this,Y&&window.addEventListener("online",function(){X(n,a)}),this.update(e)}var Y="undefined"!=typeof window,Z=Y&&!("onscroll"in window)||"undefined"!=typeof navigator&&/(gle|ing|ro)bot|crawl|spider/i.test(navigator.userAgent),tt=Y&&"IntersectionObserver"in window,et=Y&&"classList"in document.createElement("p"),nt=Y&&1<window.devicePixelRatio,at={elements_selector:".lazy",container:Z||Y?document:null,threshold:300,thresholds:null,data_src:"src",data_srcset:"srcset",data_sizes:"sizes",data_bg:"bg",data_bg_hidpi:"bg-hidpi",data_bg_multi:"bg-multi",data_bg_multi_hidpi:"bg-multi-hidpi",data_poster:"poster",class_applied:"applied",class_loading:"litespeed-loading",class_loaded:"litespeed-loaded",class_error:"error",class_entered:"entered",class_exited:"exited",unobserve_completed:!0,unobserve_entered:!1,cancel_on_exit:!0,callback_enter:null,callback_exit:null,callback_applied:null,callback_loading:null,callback_loaded:null,callback_error:null,callback_finish:null,callback_cancel:null,use_native:!1},ot="src",it="srcset",rt="sizes",ct="poster",lt="llOriginalAttrs",st="loading",ut="loaded",dt="applied",ft="error",_t="native",gt="data-",vt="ll-status",bt=[st,ut,dt,ft],pt=[ot],ht=[ot,ct],mt=[ot,it,rt],Et={IMG:function(t,e){h(t,function(t){y(t,mt),O(t,e)}),y(t,mt),O(t,e)},IFRAME:function(t,e){y(t,pt),A(t,ot,l(t,e.data_src))},VIDEO:function(t,e){a(t,function(t){y(t,pt),A(t,ot,l(t,e.data_src))}),y(t,ht),A(t,ct,l(t,e.data_poster)),A(t,ot,l(t,e.data_src)),t.load()}},It=["IMG","IFRAME","VIDEO"],yt={IMG:j,IFRAME:function(t){L(t,pt)},VIDEO:function(t){a(t,function(t){L(t,pt)}),L(t,ht),t.load()}},Lt=["IMG","IFRAME","VIDEO"];return t.prototype={update:function(t){var e,n,a,o=this._settings,i=W(t,o);{if(p(this,i.length),!Z&&tt)return q(o)?(e=o,n=this,i.forEach(function(t){-1!==Lt.indexOf(t.tagName)&&S(t,e,n)}),void p(n,0)):(t=this._observer,o=i,t.disconnect(),a=t,void o.forEach(function(t){a.observe(t)}));this.loadAll(i)}},destroy:function(){this._observer&&this._observer.disconnect(),K(this._settings).forEach(function(t){I(t)}),delete this._observer,delete this._settings,delete this.loadingCount,delete this.toLoadCount},loadAll:function(t){var e=this,n=this._settings;W(t,n).forEach(function(t){v(t,e),D(t,n,e)})},restoreAll:function(){var e=this._settings;K(e).forEach(function(t){P(t,e)})}},t.load=function(t,e){e=o(e);D(t,e)},t.resetStatus=function(t){i(t)},t}),function(t,e){"use strict";function n(){e.body.classList.add("litespeed_lazyloaded")}function a(){console.log("[LiteSpeed] Start Lazy Load"),o=new LazyLoad(Object.assign({},t.lazyLoadOptions||{},{elements_selector:"[data-lazyloaded]",callback_finish:n})),i=function(){o.update()},t.MutationObserver&&new MutationObserver(i).observe(e.documentElement,{childList:!0,subtree:!0,attributes:!0})}var o,i;t.addEventListener?t.addEventListener("load",a,!1):t.attachEvent("onload",a)}(window,document);</script><script data-no-optimize="1">window.litespeed_ui_events=window.litespeed_ui_events||["mouseover","click","keydown","wheel","touchmove","touchstart"];var urlCreator=window.URL||window.webkitURL;function litespeed_load_delayed_js_force(){console.log("[LiteSpeed] Start Load JS Delayed"),litespeed_ui_events.forEach(e=>{window.removeEventListener(e,litespeed_load_delayed_js_force,{passive:!0})}),document.querySelectorAll("iframe[data-litespeed-src]").forEach(e=>{e.setAttribute("src",e.getAttribute("data-litespeed-src"))}),"loading"==document.readyState?window.addEventListener("DOMContentLoaded",litespeed_load_delayed_js):litespeed_load_delayed_js()}litespeed_ui_events.forEach(e=>{window.addEventListener(e,litespeed_load_delayed_js_force,{passive:!0})});async function litespeed_load_delayed_js(){let t=[];for(var d in document.querySelectorAll('script[type="litespeed/javascript"]').forEach(e=>{t.push(e)}),t)await new Promise(e=>litespeed_load_one(t[d],e));document.dispatchEvent(new Event("DOMContentLiteSpeedLoaded")),window.dispatchEvent(new Event("DOMContentLiteSpeedLoaded"))}function litespeed_load_one(t,e){console.log("[LiteSpeed] Load ",t);var d=document.createElement("script");d.addEventListener("load",e),d.addEventListener("error",e),t.getAttributeNames().forEach(e=>{"type"!=e&&d.setAttribute("data-src"==e?"src":e,t.getAttribute(e))});let a=!(d.type="text/javascript");!d.src&&t.textContent&&(d.src=litespeed_inline2src(t.textContent),a=!0),t.after(d),t.remove(),a&&e()}function litespeed_inline2src(t){try{var d=urlCreator.createObjectURL(new Blob([t.replace(/^(?:<!--)?(.*?)(?:-->)?$/gm,"$1")],{type:"text/javascript"}))}catch(e){d="data:text/javascript;base64,"+btoa(t.replace(/^(?:<!--)?(.*?)(?:-->)?$/gm,"$1"))}return d}</script><script data-no-optimize="1">var litespeed_vary=document.cookie.replace(/(?:(?:^|.*;\s*)_lscache_vary\s*\=\s*([^;]*).*$)|^.*$/,"");litespeed_vary||(sessionStorage.getItem("litespeed_reloaded")?console.log("LiteSpeed: skipping guest vary reload (already reloaded this session)"):fetch("/wp-content/plugins/litespeed-cache/guest.vary.php",{method:"POST",cache:"no-cache",redirect:"follow"}).then(e=>e.json()).then(e=>{console.log(e),e.hasOwnProperty("reload")&&"yes"==e.reload&&(sessionStorage.setItem("litespeed_docref",document.referrer),sessionStorage.setItem("litespeed_reloaded","1"),window.location.reload(!0))}));</script><script data-optimized="1" type="litespeed/javascript" data-src="https://abduldev.com/wp-content/litespeed/js/0b11d7b176723f098ea69bc8efdbb073.js?ver=0291f"></script></body>
</html>
Second, Copy the bellow CSS code and paste the codes into your style.css file.
					*{
    margin: 0;
    padding: 0;
    box-sizing: border-box;
    font-family: sans-serif;
}
body{
    min-height: 100vh;
    display: flex;
    align-items: center;
    justify-content: center;
    padding: 20px;
    background: #0c0075;
}
.container{
    position: relative;
    max-width: 700px;
    width: 100%;
    background-color: #fff;
    padding: 25px;
    border-radius: 10px;
    box-shadow: 0 0 15px #0000001a;
}
.container h2{
    font-size: 24px;
    font-weight: 600;
    color: #333;
    text-align: center;
}
.container .form{
    margin-top: 30px;
}
.form .input-box{
    width: 100%;
    margin-top: 20px;
}
.input-box label{
    color: #1e1e1e;
}
.form :where(.input-box input, .select-box) {
    position: relative;
    height: 50px;
    width: 100%;
    outline: none;
    font-size: 16px;
    color: #333;
    margin-top: 8px;
    border: 1px solid #ddd;
    border-radius: 6px;
    padding: 0 15px;
}
.input-box input:focus{
    box-shadow: 0 1px 0 #0000001a;
}
.form .column{
    display: flex;
    column-gap: 15px;
}
.form .gender-box{
    margin-top: 20px;
}
.gender-box h3{
    color: #1e1e1e;
    font-size: 18px;
    font-weight: 500;
    margin-bottom: 8px;
}
.form :where(.gender-option, .gender) {
    display: flex;
    align-items: center;
    column-gap: 50px;
    flex-wrap: wrap;
}
.form .gender{
    column-gap: 5px;
}
.gender input{
    accent-color: #0c0075;
}
.form :where(.gender input, .gender label) {
    cursor: pointer;
}
.gender label{
    color: #333;
}
.address :where(input, .select-box) {
    margin-top: 15px;
}
.select-box select{
    height: 100%;
    width: 100%;
    outline: none;
    border: none;
    color: #707070;
    font-size: 16px;
}
.form button{
    height: 50px;
    width: 100%;
    background-color: #0c0075;
    color: #fff;
    font-size: 16px;
    font-weight: 500;
    letter-spacing: 1px;
    border: none;
    cursor: pointer;
    border-radius: 45px;
    margin-top: 30px;
    transition: all 0.6s ease;
}
.form button:hover{
    background-color: #1101a2;
}
/* Responsive Code */
@media screen and (max-width: 500px) {
    .form .column{
        flex-wrap: wrap;
    }
    .form :where( .gender-option, .gender) {
        row-gap: 15px;
    }
}
If you encounter any challenges in building your Registration Form or if your code isn’t functioning as intended, you’re welcome to access the source code files for this Registration Form at no cost. Simply click the download button to get the files. Additionally, you can preview a live demo of this card slider by clicking on the view live button.
Recent Posts


Categories


FAQs
A responsive registration form is a web form that dynamically adjusts its layout and design to fit different screen sizes and devices, ensuring optimal user experience across various devices like desktops, tablets, and smartphones.
Making a registration form responsive ensures that users can easily access and fill out the form regardless of the device they are using. It enhances user experience, reduces bounce rates, and increases conversion rates.
Basic knowledge of HTML and CSS is beneficial, but this tutorial is designed to be beginner-friendly, providing step-by-step instructions for creating the form. No prior experience is necessary, although familiarity with HTML and CSS will be helpful.
Yes, absolutely! The tutorial provides a foundation for building a registration form, and you can customize the design, colors, fonts, and layout to match your website’s style and branding.
Yes, you can easily add or remove fields according to your requirements. The tutorial covers the basics of creating the form structure, and you can extend it by adding more input fields as needed.
Share on Social Media
Related Articles
Modern Animated Sign Up Form Design with Free Source Code
Modern Animated Sign Up Form Design with Free Source Code A sign up form is often the first real interaction
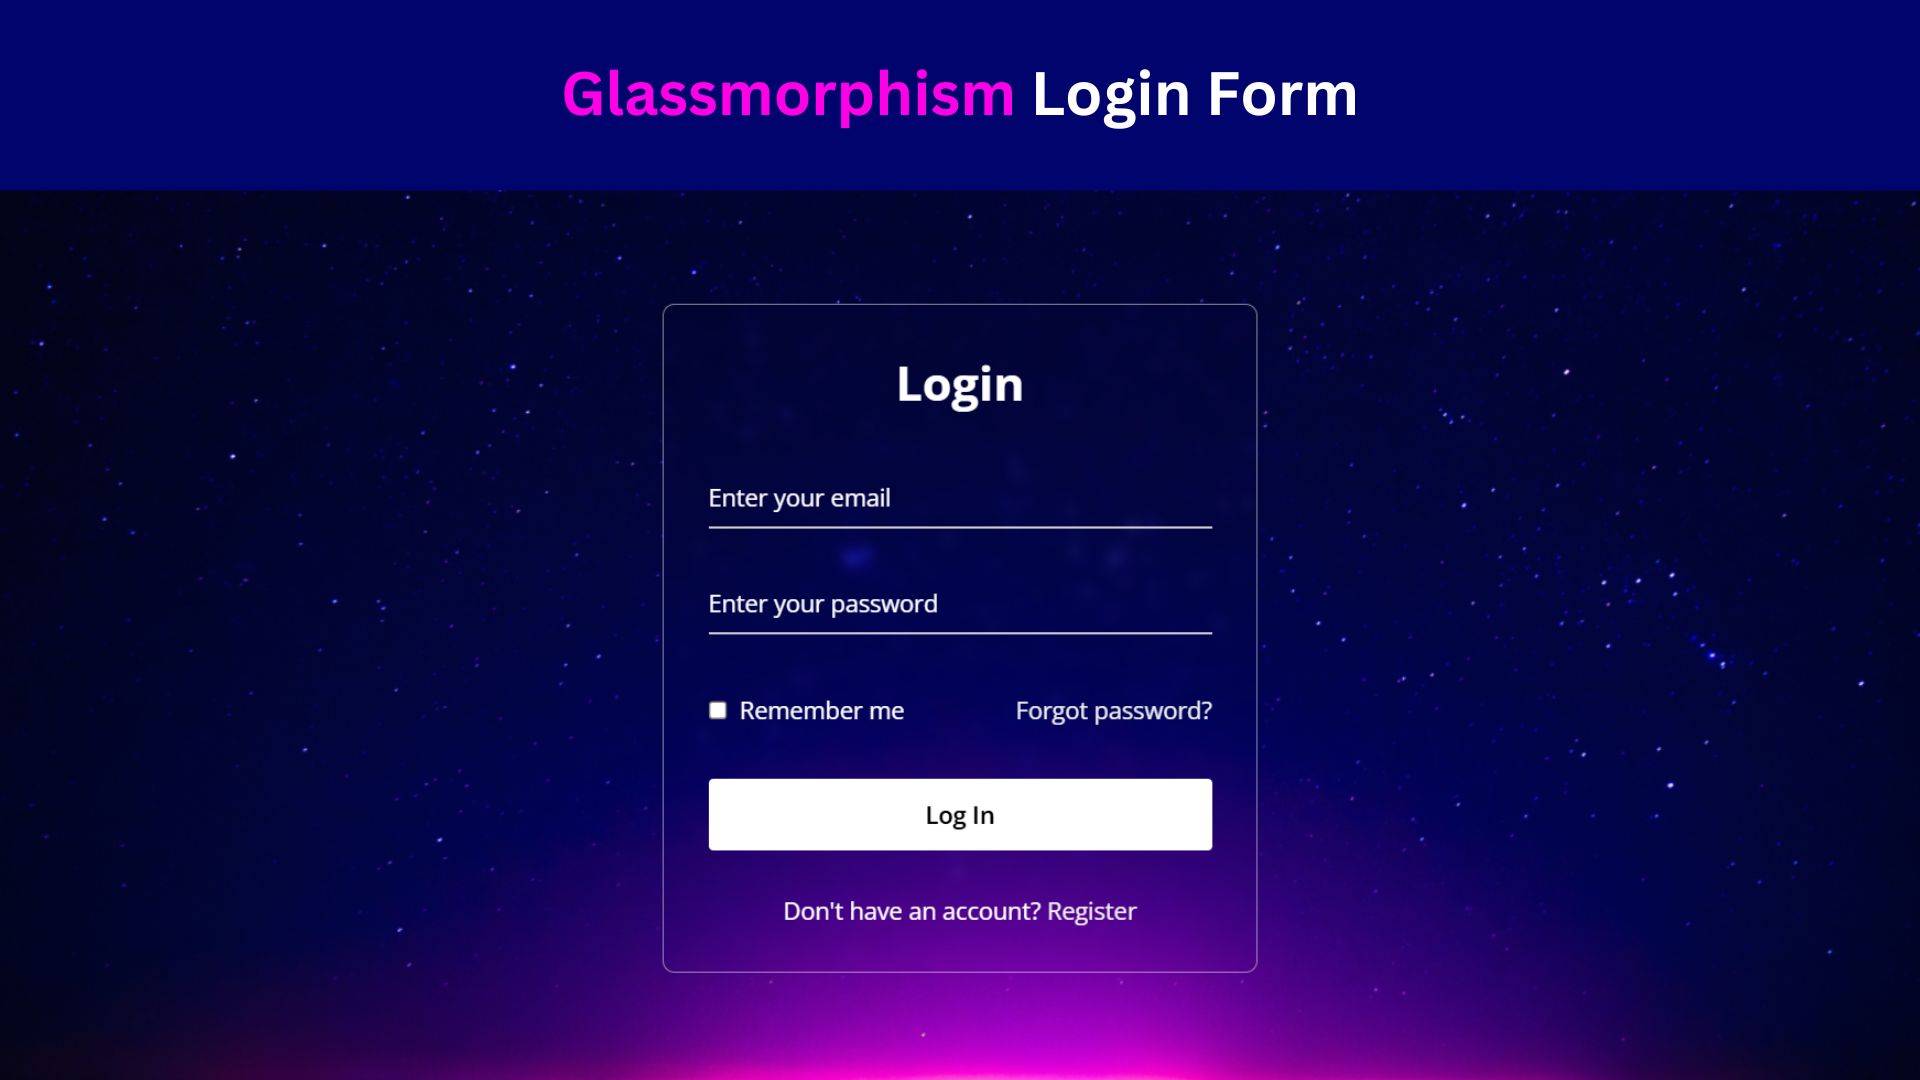
Design a Glassmorphism Login Form Using HTML and CSS
Learn how to design a sleek Glassmorphism Login Form using HTML and CSS! Follow this step-by-step guide to create a

Create a Responsive Website: Integrate Login and Registration Form
Learn how to create a responsive website with integrated login and registration forms using HTML, CSS, and JavaScript. Free Source