
How to Build an AI Image Generator Using HTML, CSS, and JavaScript (Step-by-Step Guide)
Want to turn words into stunning visuals using just HTML, CSS, and JavaScript? In this step-by-step guide, you’ll learn how to build a fully responsive AI Image Generator by integrating the powerful Hugging Face API. Whether you’re a beginner or a frontend developer looking to explore AI, this project is a perfect blend of creativity and code. Let’s dive into building your very own text-to-image generator — no backend required!
AI Image Generators in Web Development
AI image generators are revolutionizing the way we create digital visuals. From generating artwork to turning text into lifelike images, these tools are now accessible to web developers thanks to powerful APIs and JavaScript. If you’ve ever wanted to create your own AI image generator using HTML, CSS, and JavaScript, you’re in the right place.
This article walks you through a complete HTML CSS JavaScript project that combines creative coding with AI-powered image creation. Whether you’re a student, hobbyist, or pro developer, you’ll learn how to build a text to image generator JavaScript app using modern tools like the Hugging Face API.
The best part? This is a fully client-side image generator, making it lightweight and browser-ready. You don’t need advanced AI skills, just basic web development knowledge and an interest in AI. By the end of this tutorial, you’ll have your own web-based AI image generator that can take user prompts and return unique, AI-generated visuals. Let’s dive into this frontend AI project that blends art and code seamlessly.
Why Build Your Own AI Image Generator?
Creating your own JavaScript AI image generator is more than a fun challenge — it’s a chance to explore the possibilities of modern web development and AI integration. In an era where images play a vital role in branding, marketing, and UX, an AI image generator gives you creative power.
When you build your own image generator web app, you’re not just experimenting with visuals — you’re learning about text-to-image synthesis, JavaScript API integration, and real-world use of AI. This project boosts your skills and adds a unique asset to your portfolio. It’s a practical, simple AI project using HTML, CSS, and JavaScript that demonstrates your grasp of modern web trends.
Beyond personal learning, this tool can be used for content creation, AI art, or integrated into websites for user engagement. Think about startups, art generators, or educational platforms — all could benefit from a custom-built AI image generator. It’s also a great intro into building responsive web apps with AI, especially for those looking to specialize in AI or frontend development.
Whether for fun, freelancing, or career growth, this project is your gateway into creative coding with AI.
Check Out Those Useful Articles
Tools and Technologies You’ll Need (HTML, CSS, JavaScript, and API)
To create an AI image tool with web technologies, you don’t need a huge tech stack. All you need is a working knowledge of HTML, CSS, and JavaScript, along with an API to handle the AI side.
HTML forms the structure of your interface — buttons, input fields, and image containers. CSS brings it to life with responsive styling, color modes, and layout design. JavaScript handles the dynamic logic, including fetching user input, making API calls, and updating the DOM with generated images.
The real power comes from the AI image API, and in this case, we’ll be using the Hugging Face API image generation endpoint. It’s reliable, developer-friendly, and perfect for text to image converter JavaScript projects. You’ll also use the Fetch API in JavaScript to send user prompts and receive image URLs in return.
This project is an ideal image generator frontend project, helping you learn not just how to code an app, but how to work with real-world APIs. Whether you’re learning or showcasing your skills, this stack is light, fast, and powerful enough to build a JavaScript image generator from scratch.
Overview of the Hugging Face API for AI Image Generation
The Hugging Face API is one of the best platforms for developers exploring AI-powered image creation. It offers a variety of models trained in text-to-image synthesis, making it easy to convert plain text into stunning AI-generated visuals.
To get started, you’ll need to create a free Hugging Face account and grab your API key. This key allows your frontend AI project to send secure requests to the model of your choice. For this tutorial, we recommend using the “Stable Diffusion” model, which delivers high-quality results for a wide range of prompts.
By integrating this API, you can build a JavaScript AI image generator that’s fast, lightweight, and powerful. Each API call includes the text prompt, and the response returns an image URL, which you can instantly display on your website. This makes it perfect for a client-side image generator with zero backend setup.
With Hugging Face, you’re not just consuming AI — you’re integrating it into your UI like a pro. It’s a great way to demonstrate JavaScript API integration examples and real-world AI use cases within web apps.
Step-by-Step Guide to Building a AI Image Generation
To Create a AI Image Generation follow these steps:
- Create a Folder: Name this folder according to your preference. Inside this folder, you’ll need to set up the following files:
- Create an index.html File: This file should be named index with the .html extension.
- Create a style.css File: This file should be named style with the .css extension.
- Create a main.js File: This file should be name main with the .js extension.
- Hugging Face: Create an account on Hugging Face for API
These files will form the basis of your AI Image Generation.
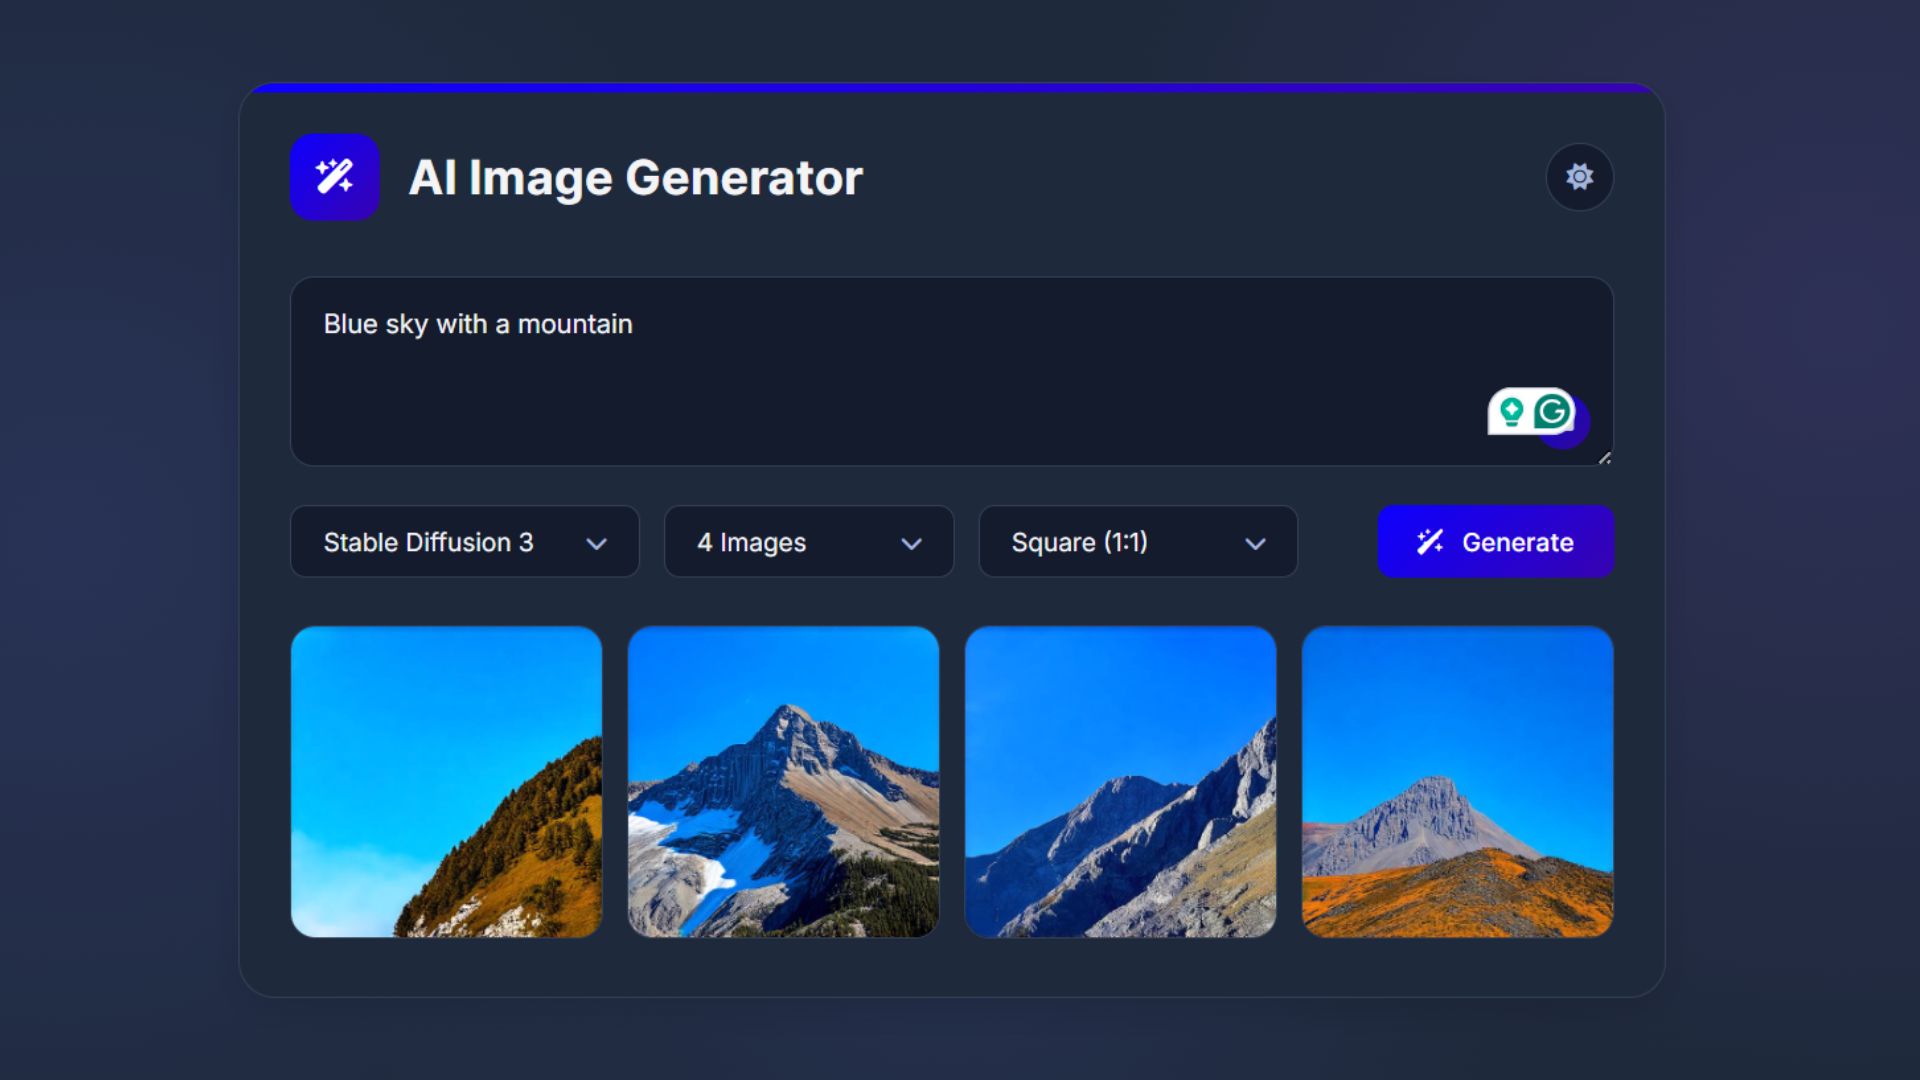
Writing the HTML Structure for the AI Image Generation
Now, open your code editor and set up a new HTML file, copy those HTML Codes and Paste those Codes on index.html file.
					<!DOCTYPE html>
<html lang="en">
<head>
    <meta charset="UTF-8">
    <meta name="viewport" content="width=device-width, initial-scale=1.0">
    <title>AI Image Generator by AbdulDev</title>

    <link rel="stylesheet" href="https://cdnjs.cloudflare.com/ajax/libs/font-awesome/6.4.0/css/all.min.css" />

    <link rel="stylesheet" href="style.css" />
</head>
<body>
    <div class="container">
        <header class="header">
          <div class="logo-wrapper">
            <div class="logo">
              <i class="fa-solid fa-wand-magic-sparkles"></i>
            </div>
            <h1>AI Image Generator</h1>
          </div>
          <button class="theme-toggle">
            <i class="fa-solid fa-moon"></i>
          </button>
        </header>
        <div class="main-content">
          <form action="#" class="prompt-form">
            <div class="prompt-container">
              <textarea class="prompt-input" placeholder="Describe your imagination in detail..." spellcheck="false" autofocus required></textarea>
              <button type="button" class="prompt-btn" title="Get Random Prompt">
                <i class="fa-solid fa-dice"></i>
              </button>
            </div>
            <div class="prompt-actions">
              <div class="select-wrapper">
                <select class="custom-select" id="model-select" required>
                  <option value="" selected disabled>Select Model</option>
                  <option value="black-forest-labs/FLUX.1-dev">FLUX.1-dev</option>
                  <option value="black-forest-labs/FLUX.1-schnell">FLUX.1-schnell</option>
                  <option value="stabilityai/stable-diffusion-xl-base-1.0">Stable Diffusion XL</option>
                  <option value="runwayml/stable-diffusion-v1-5">Stable Diffusion v1.5</option>
                  <option value="stabilityai/stable-diffusion-3-medium-diffusers">Stable Diffusion 3</option>
                </select>
              </div>
              <div class="select-wrapper">
                <select class="custom-select" id="count-select" required>
                  <option value="" selected disabled>Image Count</option>
                  <option value="1">1 Image</option>
                  <option value="2">2 Images</option>
                  <option value="3">3 Images</option>
                  <option value="4">4 Images</option>
                </select>
              </div>
              <div class="select-wrapper">
                <select class="custom-select" id="ratio-select" required>
                  <option value="" selected disabled>Aspect Ratio</option>
                  <option value="1/1">Square (1:1)</option>
                  <option value="16/9">Landscape (16:9)</option>
                  <option value="9/16">Portrait (9:16)</option>
                </select>
              </div>
              <button type="submit" class="generate-btn">
                <i class="fa-solid fa-wand-sparkles"></i>
                Generate
              </button>
            </div>
          <input
                    class="apbct_special_field apbct_email_id__elementor_form"
                    name="apbct__email_id__elementor_form"
                    aria-label="apbct__label_id__elementor_form"
                    type="text" size="30" maxlength="200" autocomplete="off"
                    value=""
                /></form>
          <div class="gallery-grid"></div>
        </div>
      </div>

       <script type="litespeed/javascript" data-src="main.js"></script> <script data-no-optimize="1">window.lazyLoadOptions=Object.assign({},{threshold:300},window.lazyLoadOptions||{});!function(t,e){"object"==typeof exports&&"undefined"!=typeof module?module.exports=e():"function"==typeof define&&define.amd?define(e):(t="undefined"!=typeof globalThis?globalThis:t||self).LazyLoad=e()}(this,function(){"use strict";function e(){return(e=Object.assign||function(t){for(var e=1;e<arguments.length;e++){var n,a=arguments[e];for(n in a)Object.prototype.hasOwnProperty.call(a,n)&&(t[n]=a[n])}return t}).apply(this,arguments)}function o(t){return e({},at,t)}function l(t,e){return t.getAttribute(gt+e)}function c(t){return l(t,vt)}function s(t,e){return function(t,e,n){e=gt+e;null!==n?t.setAttribute(e,n):t.removeAttribute(e)}(t,vt,e)}function i(t){return s(t,null),0}function r(t){return null===c(t)}function u(t){return c(t)===_t}function d(t,e,n,a){t&&(void 0===a?void 0===n?t(e):t(e,n):t(e,n,a))}function f(t,e){et?t.classList.add(e):t.className+=(t.className?" ":"")+e}function _(t,e){et?t.classList.remove(e):t.className=t.className.replace(new RegExp("(^|\\s+)"+e+"(\\s+|$)")," ").replace(/^\s+/,"").replace(/\s+$/,"")}function g(t){return t.llTempImage}function v(t,e){!e||(e=e._observer)&&e.unobserve(t)}function b(t,e){t&&(t.loadingCount+=e)}function p(t,e){t&&(t.toLoadCount=e)}function n(t){for(var e,n=[],a=0;e=t.children[a];a+=1)"SOURCE"===e.tagName&&n.push(e);return n}function h(t,e){(t=t.parentNode)&&"PICTURE"===t.tagName&&n(t).forEach(e)}function a(t,e){n(t).forEach(e)}function m(t){return!!t[lt]}function E(t){return t[lt]}function I(t){return delete t[lt]}function y(e,t){var n;m(e)||(n={},t.forEach(function(t){n[t]=e.getAttribute(t)}),e[lt]=n)}function L(a,t){var o;m(a)&&(o=E(a),t.forEach(function(t){var e,n;e=a,(t=o[n=t])?e.setAttribute(n,t):e.removeAttribute(n)}))}function k(t,e,n){f(t,e.class_loading),s(t,st),n&&(b(n,1),d(e.callback_loading,t,n))}function A(t,e,n){n&&t.setAttribute(e,n)}function O(t,e){A(t,rt,l(t,e.data_sizes)),A(t,it,l(t,e.data_srcset)),A(t,ot,l(t,e.data_src))}function w(t,e,n){var a=l(t,e.data_bg_multi),o=l(t,e.data_bg_multi_hidpi);(a=nt&&o?o:a)&&(t.style.backgroundImage=a,n=n,f(t=t,(e=e).class_applied),s(t,dt),n&&(e.unobserve_completed&&v(t,e),d(e.callback_applied,t,n)))}function x(t,e){!e||0<e.loadingCount||0<e.toLoadCount||d(t.callback_finish,e)}function M(t,e,n){t.addEventListener(e,n),t.llEvLisnrs[e]=n}function N(t){return!!t.llEvLisnrs}function z(t){if(N(t)){var e,n,a=t.llEvLisnrs;for(e in a){var o=a[e];n=e,o=o,t.removeEventListener(n,o)}delete t.llEvLisnrs}}function C(t,e,n){var a;delete t.llTempImage,b(n,-1),(a=n)&&--a.toLoadCount,_(t,e.class_loading),e.unobserve_completed&&v(t,n)}function R(i,r,c){var l=g(i)||i;N(l)||function(t,e,n){N(t)||(t.llEvLisnrs={});var a="VIDEO"===t.tagName?"loadeddata":"load";M(t,a,e),M(t,"error",n)}(l,function(t){var e,n,a,o;n=r,a=c,o=u(e=i),C(e,n,a),f(e,n.class_loaded),s(e,ut),d(n.callback_loaded,e,a),o||x(n,a),z(l)},function(t){var e,n,a,o;n=r,a=c,o=u(e=i),C(e,n,a),f(e,n.class_error),s(e,ft),d(n.callback_error,e,a),o||x(n,a),z(l)})}function T(t,e,n){var a,o,i,r,c;t.llTempImage=document.createElement("IMG"),R(t,e,n),m(c=t)||(c[lt]={backgroundImage:c.style.backgroundImage}),i=n,r=l(a=t,(o=e).data_bg),c=l(a,o.data_bg_hidpi),(r=nt&&c?c:r)&&(a.style.backgroundImage='url("'.concat(r,'")'),g(a).setAttribute(ot,r),k(a,o,i)),w(t,e,n)}function G(t,e,n){var a;R(t,e,n),a=e,e=n,(t=Et[(n=t).tagName])&&(t(n,a),k(n,a,e))}function D(t,e,n){var a;a=t,(-1<It.indexOf(a.tagName)?G:T)(t,e,n)}function S(t,e,n){var a;t.setAttribute("loading","lazy"),R(t,e,n),a=e,(e=Et[(n=t).tagName])&&e(n,a),s(t,_t)}function V(t){t.removeAttribute(ot),t.removeAttribute(it),t.removeAttribute(rt)}function j(t){h(t,function(t){L(t,mt)}),L(t,mt)}function F(t){var e;(e=yt[t.tagName])?e(t):m(e=t)&&(t=E(e),e.style.backgroundImage=t.backgroundImage)}function P(t,e){var n;F(t),n=e,r(e=t)||u(e)||(_(e,n.class_entered),_(e,n.class_exited),_(e,n.class_applied),_(e,n.class_loading),_(e,n.class_loaded),_(e,n.class_error)),i(t),I(t)}function U(t,e,n,a){var o;n.cancel_on_exit&&(c(t)!==st||"IMG"===t.tagName&&(z(t),h(o=t,function(t){V(t)}),V(o),j(t),_(t,n.class_loading),b(a,-1),i(t),d(n.callback_cancel,t,e,a)))}function $(t,e,n,a){var o,i,r=(i=t,0<=bt.indexOf(c(i)));s(t,"entered"),f(t,n.class_entered),_(t,n.class_exited),o=t,i=a,n.unobserve_entered&&v(o,i),d(n.callback_enter,t,e,a),r||D(t,n,a)}function q(t){return t.use_native&&"loading"in HTMLImageElement.prototype}function H(t,o,i){t.forEach(function(t){return(a=t).isIntersecting||0<a.intersectionRatio?$(t.target,t,o,i):(e=t.target,n=t,a=o,t=i,void(r(e)||(f(e,a.class_exited),U(e,n,a,t),d(a.callback_exit,e,n,t))));var e,n,a})}function B(e,n){var t;tt&&!q(e)&&(n._observer=new IntersectionObserver(function(t){H(t,e,n)},{root:(t=e).container===document?null:t.container,rootMargin:t.thresholds||t.threshold+"px"}))}function J(t){return Array.prototype.slice.call(t)}function K(t){return t.container.querySelectorAll(t.elements_selector)}function Q(t){return c(t)===ft}function W(t,e){return e=t||K(e),J(e).filter(r)}function X(e,t){var n;(n=K(e),J(n).filter(Q)).forEach(function(t){_(t,e.class_error),i(t)}),t.update()}function t(t,e){var n,a,t=o(t);this._settings=t,this.loadingCount=0,B(t,this),n=t,a=this,Y&&window.addEventListener("online",function(){X(n,a)}),this.update(e)}var Y="undefined"!=typeof window,Z=Y&&!("onscroll"in window)||"undefined"!=typeof navigator&&/(gle|ing|ro)bot|crawl|spider/i.test(navigator.userAgent),tt=Y&&"IntersectionObserver"in window,et=Y&&"classList"in document.createElement("p"),nt=Y&&1<window.devicePixelRatio,at={elements_selector:".lazy",container:Z||Y?document:null,threshold:300,thresholds:null,data_src:"src",data_srcset:"srcset",data_sizes:"sizes",data_bg:"bg",data_bg_hidpi:"bg-hidpi",data_bg_multi:"bg-multi",data_bg_multi_hidpi:"bg-multi-hidpi",data_poster:"poster",class_applied:"applied",class_loading:"litespeed-loading",class_loaded:"litespeed-loaded",class_error:"error",class_entered:"entered",class_exited:"exited",unobserve_completed:!0,unobserve_entered:!1,cancel_on_exit:!0,callback_enter:null,callback_exit:null,callback_applied:null,callback_loading:null,callback_loaded:null,callback_error:null,callback_finish:null,callback_cancel:null,use_native:!1},ot="src",it="srcset",rt="sizes",ct="poster",lt="llOriginalAttrs",st="loading",ut="loaded",dt="applied",ft="error",_t="native",gt="data-",vt="ll-status",bt=[st,ut,dt,ft],pt=[ot],ht=[ot,ct],mt=[ot,it,rt],Et={IMG:function(t,e){h(t,function(t){y(t,mt),O(t,e)}),y(t,mt),O(t,e)},IFRAME:function(t,e){y(t,pt),A(t,ot,l(t,e.data_src))},VIDEO:function(t,e){a(t,function(t){y(t,pt),A(t,ot,l(t,e.data_src))}),y(t,ht),A(t,ct,l(t,e.data_poster)),A(t,ot,l(t,e.data_src)),t.load()}},It=["IMG","IFRAME","VIDEO"],yt={IMG:j,IFRAME:function(t){L(t,pt)},VIDEO:function(t){a(t,function(t){L(t,pt)}),L(t,ht),t.load()}},Lt=["IMG","IFRAME","VIDEO"];return t.prototype={update:function(t){var e,n,a,o=this._settings,i=W(t,o);{if(p(this,i.length),!Z&&tt)return q(o)?(e=o,n=this,i.forEach(function(t){-1!==Lt.indexOf(t.tagName)&&S(t,e,n)}),void p(n,0)):(t=this._observer,o=i,t.disconnect(),a=t,void o.forEach(function(t){a.observe(t)}));this.loadAll(i)}},destroy:function(){this._observer&&this._observer.disconnect(),K(this._settings).forEach(function(t){I(t)}),delete this._observer,delete this._settings,delete this.loadingCount,delete this.toLoadCount},loadAll:function(t){var e=this,n=this._settings;W(t,n).forEach(function(t){v(t,e),D(t,n,e)})},restoreAll:function(){var e=this._settings;K(e).forEach(function(t){P(t,e)})}},t.load=function(t,e){e=o(e);D(t,e)},t.resetStatus=function(t){i(t)},t}),function(t,e){"use strict";function n(){e.body.classList.add("litespeed_lazyloaded")}function a(){console.log("[LiteSpeed] Start Lazy Load"),o=new LazyLoad(Object.assign({},t.lazyLoadOptions||{},{elements_selector:"[data-lazyloaded]",callback_finish:n})),i=function(){o.update()},t.MutationObserver&&new MutationObserver(i).observe(e.documentElement,{childList:!0,subtree:!0,attributes:!0})}var o,i;t.addEventListener?t.addEventListener("load",a,!1):t.attachEvent("onload",a)}(window,document);</script><script data-no-optimize="1">window.litespeed_ui_events=window.litespeed_ui_events||["mouseover","click","keydown","wheel","touchmove","touchstart"];var urlCreator=window.URL||window.webkitURL;function litespeed_load_delayed_js_force(){console.log("[LiteSpeed] Start Load JS Delayed"),litespeed_ui_events.forEach(e=>{window.removeEventListener(e,litespeed_load_delayed_js_force,{passive:!0})}),document.querySelectorAll("iframe[data-litespeed-src]").forEach(e=>{e.setAttribute("src",e.getAttribute("data-litespeed-src"))}),"loading"==document.readyState?window.addEventListener("DOMContentLoaded",litespeed_load_delayed_js):litespeed_load_delayed_js()}litespeed_ui_events.forEach(e=>{window.addEventListener(e,litespeed_load_delayed_js_force,{passive:!0})});async function litespeed_load_delayed_js(){let t=[];for(var d in document.querySelectorAll('script[type="litespeed/javascript"]').forEach(e=>{t.push(e)}),t)await new Promise(e=>litespeed_load_one(t[d],e));document.dispatchEvent(new Event("DOMContentLiteSpeedLoaded")),window.dispatchEvent(new Event("DOMContentLiteSpeedLoaded"))}function litespeed_load_one(t,e){console.log("[LiteSpeed] Load ",t);var d=document.createElement("script");d.addEventListener("load",e),d.addEventListener("error",e),t.getAttributeNames().forEach(e=>{"type"!=e&&d.setAttribute("data-src"==e?"src":e,t.getAttribute(e))});let a=!(d.type="text/javascript");!d.src&&t.textContent&&(d.src=litespeed_inline2src(t.textContent),a=!0),t.after(d),t.remove(),a&&e()}function litespeed_inline2src(t){try{var d=urlCreator.createObjectURL(new Blob([t.replace(/^(?:<!--)?(.*?)(?:-->)?$/gm,"$1")],{type:"text/javascript"}))}catch(e){d="data:text/javascript;base64,"+btoa(t.replace(/^(?:<!--)?(.*?)(?:-->)?$/gm,"$1"))}return d}</script><script data-no-optimize="1">var litespeed_vary=document.cookie.replace(/(?:(?:^|.*;\s*)_lscache_vary\s*\=\s*([^;]*).*$)|^.*$/,"");litespeed_vary||(sessionStorage.getItem("litespeed_reloaded")?console.log("LiteSpeed: skipping guest vary reload (already reloaded this session)"):fetch("/wp-content/plugins/litespeed-cache/guest.vary.php",{method:"POST",cache:"no-cache",redirect:"follow"}).then(e=>e.json()).then(e=>{console.log(e),e.hasOwnProperty("reload")&&"yes"==e.reload&&(sessionStorage.setItem("litespeed_docref",document.referrer),sessionStorage.setItem("litespeed_reloaded","1"),window.location.reload(!0))}));</script><script data-optimized="1" type="litespeed/javascript" data-src="https://abduldev.com/wp-content/litespeed/js/7fe1310795158832f29b04022f155574.js?ver=6dede"></script></body>
</html>
Styling the AI Image Generation Using CSS
After that, copy those CSS Codes and Paste those Codes on style.css file.
					@import url('https://fonts.googleapis.com/css2?family=Inter:opsz,wght@14..32,100..900&display=swap');

* {
  margin: 0;
  padding: 0;
  box-sizing: border-box;
  font-family: "Inter", sans-serif;
}
:root {
  --color-primary: #5C56E1;
  --color-primary-dark: #5b21b6;
  --color-accent: #8B5CF6;
  --color-card: #FFFFFF;
  --color-input: #F1F1FF;
  --color-text: #09090E;
  --color-placeholder: #5C5A87;
  --color-border: #D4D4ED;
  --color-gradient: linear-gradient(135deg, #0d00ff, #3703b0);
}
body.dark-theme {
  --color-card: #1E293B;
  --color-input: #141B2D;
  --color-text: #F3F4F6;
  --color-placeholder: #A3B6DC;
  --color-border: #334155;
  background: var(--color-card);
  background-image: radial-gradient(circle at 15% 50%, #6366f126 0%, transparent 35%), radial-gradient(circle at 85% 30%, #8b5cf626 0%, transparent 35%), radial-gradient(circle at 50% 80%, #6366f11a 0%, transparent 40%);
}
body {
  display: flex;
  width: 100%;
  padding: 15px;
  align-items: center;
  justify-content: center;
  min-height: 100vh;
  color: var(--color-text);
  background-image: linear-gradient(#E9E9FF, #C8C7FF);
}
.container {
  width: 900px;
  padding: 32px;
  border-radius: 23px;
  position: relative;
  background: var(--color-card);
  box-shadow: 0 10px 20px 0 #0000001a;
  transition: all 0.3s ease;
  overflow: hidden;
}
.container::before {
  content: "";
  position: absolute;
  top: 0;
  left: 0;
  width: 100%;
  height: 6px;
  background-image: var(--color-gradient);
}
body.dark-theme .container {
  border: 1px solid var(--color-border);
}
.header {
  display: flex;
  align-items: center;
  margin-bottom: 32px;
  justify-content: space-between;
}
.header .logo-wrapper {
  display: flex;
  gap: 18px;
  align-items: center;
}
.header .logo-wrapper .logo {
  height: 55px;
  width: 56px;
  display: flex;
  color: #fff;
  flex-shrink: 0;
  font-size: 1.35rem;
  align-items: center;
  border-radius: 15px;
  justify-content: center;
  background-image: var(--color-gradient);
}
.header .logo-wrapper h1 {
  font-size: 1.9rem;
  font-weight: 700;
}
.header .theme-toggle {
  height: 43px;
  width: 43px;
  display: flex;
  font-size: 1.05rem;
  cursor: pointer;
  flex-shrink: 0;
  align-items: center;
  justify-content: center;
  border-radius: 50%;
  color: var(--color-placeholder);
  background: var(--color-input);
  border: 1px solid var(--color-border);
  transition: all 0.3s ease;
}
.header .theme-toggle:hover {
  color: var(--color-primary);
  transform: translateY(-2px);
  box-shadow: 0 4px 6px -1px #0000001a;
}
.main-content {
  margin: 35px 0 5px 0;
}
.prompt-container {
  position: relative;
  width: 100%;
  margin-bottom: 20px;
}
.prompt-container .prompt-input {
  width: 100%;
  line-height: 1.6;
  resize: vertical;
  font-size: 1.05rem;
  padding: 16px 20px;
  min-height: 120px;
  border-radius: 15px;
  color: var(--color-text);
  background: var(--color-input);
  border: 1px solid var(--color-border);
  transition: all 0.3s ease;
}
.prompt-container .prompt-input:focus {
  border-color: var(--color-accent);
  box-shadow: 0 0 0 4px #8b5cf626;
  outline: none;
}
.prompt-container .prompt-input::placeholder {
  color: var(--color-placeholder);
}
.prompt-container .prompt-btn {
  position: absolute;
  right: 15px;
  bottom: 15px;
  height: 35px;
  width: 35px;
  display: flex;
  font-size: 0.75rem;
  align-items: center;
  justify-content: center;
  background: var(--color-gradient);
  color: #fff;
  border: none;
  border-radius: 50%;
  cursor: pointer;
  opacity: 0.8;
  transition: all 0.3s ease;
}
.prompt-container .prompt-btn:hover {
  opacity: 1 !important;
  transform: translateY(-2px);
  box-shadow: 0 4px 6px -1px #0000001a;
}
.main-content .prompt-actions {
  display: grid;
  gap: 15px;
  grid-template-columns: 1.2fr 1fr 1.1fr 1fr;
}
.prompt-actions .select-wrapper {
  position: relative;
}
.prompt-actions .select-wrapper::after {
  content: "\f078";
  font-family: "Font Awesome 6 Free";
  font-weight: 900;
  position: absolute;
  right: 20px;
  top: 50%;
  padding-left: 7px;
  background: var(--color-input);
  transform: translateY(-50%);
  color: var(--color-placeholder);
  pointer-events: none;
  font-size: 0.9rem;
  transition: all 0.3s ease;
}
.prompt-actions :where(.custom-select, .generate-btn) {
  border-radius: 10px;
  cursor: pointer;
  font-size: 1rem;
  padding: 12px 20px;
  color: var(--color-text);
  background: var(--color-input);
  border: 1px solid var(--color-border);
  transition: all 0.3s ease;
}
.prompt-actions .select-wrapper .custom-select {
  width: 100%;
  outline: none;
  height: 100%;
  appearance: none;
}
.prompt-actions .custom-select:is(:focus, :hover) {
  border-color: var(--color-accent);
  box-shadow: 0 0 0 3px #8b5cf61a;
}
.prompt-actions .generate-btn {
  display: flex;
  gap: 12px;
  font-weight: 500;
  border: none;
  color: #fff;
  margin-left: auto;
  align-items: center;
  justify-content: center;
  padding: 12px 25px;
  background-image: var(--color-gradient);
}
.prompt-actions .generate-btn:hover {
  transform: translateY(-2px);
  box-shadow: 0 4px 10px #6d28d94d;
}
.prompt-actions .generate-btn:disabled {
  opacity: 0.6;
  pointer-events: none;
}
.main-content .gallery-grid {
  display: grid;
  gap: 15px;
  grid-template-columns: repeat(auto-fill, minmax(180px, 1fr));
}
.main-content .gallery-grid:has(.img-card) {
  margin-top: 30px;
}
.gallery-grid .img-card {
  display: flex;
  flex-direction: column;
  align-items: center;
  justify-content: center;
  position: relative;
  overflow: hidden;
  border-radius: 16px;
  opacity: 0;
  transform: translateY(20px);
  transition: all 0.5s ease;
  background: var(--color-input);
  border: 1px solid var(--color-border);
  box-shadow: 0 1px 2px #0000000d;
}
.gallery-grid .img-card.animate-in {
  opacity: 1;
  transform: translateY(0);
}
.gallery-grid .img-card:not(.loading, .error):hover {
  transform: translateY(-5px);
  box-shadow: 0 10px 15px -3px #0000001a;
}
.gallery-grid .img-card.loading .spinner {
  width: 35px;
  height: 35px;
  border-radius: 50%;
  border: 3px solid var(--color-border);
  border-top-color: var(--color-primary);
  animation: spin 1s linear infinite;
}
@keyframes spin {
  to {
    transform: rotate(360deg);
  }
}
.gallery-grid .img-card .status-container {
  display: none;
  gap: 13px;
  padding: 15px;
  align-items: center;
  flex-direction: column;
}
.gallery-grid .img-card:where(.loading, .error) .status-container {
  display: flex;
}
.gallery-grid .img-card.error .spinner,
.gallery-grid .img-card.loading i {
  display: none;
}
.gallery-grid .img-card .status-container .status-text {
  font-size: 0.85rem;
  text-align: center;
  color: var(--color-placeholder);
}
.gallery-grid .img-card .status-container i {
  font-size: 1.7rem;
  color: #ef4444;
}
.gallery-grid .img-card .result-img {
  width: 100%;
  height: 100%;
  object-fit: cover;
  transition: all 0.3s ease;
}
.gallery-grid .img-card .img-overlay {
  position: absolute;
  bottom: 0;
  left: 0;
  right: 0;
  padding: 20px;
  opacity: 0;
  display: flex;
  justify-content: flex-end;
  transition: all 0.3s ease;
  background: linear-gradient(transparent, #000000cc);
}
.gallery-grid .img-card:hover .img-overlay {
  opacity: 1;
}
.gallery-grid .img-card:where(.loading, .error) :is(.result-img, .img-overlay) {
  display: none;
}
.gallery-grid .img-card .img-download-btn {
  height: 45px;
  width: 45px;
  display: flex;
  align-items: center;
  justify-content: center;
  border: none;
  color: #fff;
  cursor: pointer;
  backdrop-filter: blur(5px);
  border-radius: 50%;
  background: #ffffff40;
  transition: all 0.3s ease;
}
.gallery-grid .img-card .img-download-btn:hover {
  background: #ffffff66;
  transform: scale(1.05);
}
/* Responsive media query code for small screens */
@media (max-width: 768px) {
  .container {
    padding: 18px;
  }
  .header .logo-wrapper .logo {
    height: 50px;
    width: 51px;
    font-size: 1.25rem;
  }
  .header .logo-wrapper h1 {
    font-size: 1.7rem;
  }
  .main-content .prompt-actions {
    grid-template-columns: 1fr;
    margin-top: -10px;
  }
  .prompt-actions .generate-btn {
    margin: 10px 0 0;
  }
  .gallery-grid .img-card .img-overlay {
    opacity: 1;
  }
}
Adding JavaScript to Enable AI Image Generation and Toggle Functions
And lastly, Copy the below JS code and paste it into the main.js file.
					const promptForm = document.querySelector(".prompt-form");
const themeToggle = document.querySelector(".theme-toggle");
const promptBtn = document.querySelector(".prompt-btn");
const promptInput = document.querySelector(".prompt-input");
const generateBtn = document.querySelector(".generate-btn");
const galleryGrid = document.querySelector(".gallery-grid");
const modelSelect = document.getElementById("model-select");
const countSelect = document.getElementById("count-select");
const ratioSelect = document.getElementById("ratio-select");
const API_KEY = "PASTE-YOUR-API-KEY"; // Hugging Face API Key
// Example prompts
const examplePrompts = [
  "A magic forest with glowing plants and fairy homes among giant mushrooms",
  "An old steampunk airship floating through golden clouds at sunset",
  "A future Mars colony with glass domes and gardens against red mountains",
  "A dragon sleeping on gold coins in a crystal cave",
  "An underwater kingdom with merpeople and glowing coral buildings",
  "A floating island with waterfalls pouring into clouds below",
  "A witch's cottage in fall with magic herbs in the garden",
  "A robot painting in a sunny studio with art supplies around it",
  "A magical library with floating glowing books and spiral staircases",
  "A Japanese shrine during cherry blossom season with lanterns and misty mountains",
  "A cosmic beach with glowing sand and an aurora in the night sky",
  "A medieval marketplace with colorful tents and street performers",
  "A cyberpunk city with neon signs and flying cars at night",
  "A peaceful bamboo forest with a hidden ancient temple",
  "A giant turtle carrying a village on its back in the ocean",
];
// Set theme based on saved preference or system default
(() => {
  const savedTheme = localStorage.getItem("theme");
  const systemPrefersDark = window.matchMedia("(prefers-color-scheme: dark)").matches;
  const isDarkTheme = savedTheme === "dark" || (!savedTheme && systemPrefersDark);
  document.body.classList.toggle("dark-theme", isDarkTheme);
  themeToggle.querySelector("i").className = isDarkTheme ? "fa-solid fa-sun" : "fa-solid fa-moon";
})();
// Switch between light and dark themes
const toggleTheme = () => {
  const isDarkTheme = document.body.classList.toggle("dark-theme");
  localStorage.setItem("theme", isDarkTheme ? "dark" : "light");
  themeToggle.querySelector("i").className = isDarkTheme ? "fa-solid fa-sun" : "fa-solid fa-moon";
};
// Calculate width/height based on chosen ratio
const getImageDimensions = (aspectRatio, baseSize = 512) => {
  const [width, height] = aspectRatio.split("/").map(Number);
  const scaleFactor = baseSize / Math.sqrt(width * height);
  let calculatedWidth = Math.round(width * scaleFactor);
  let calculatedHeight = Math.round(height * scaleFactor);
  // Ensure dimensions are multiples of 16 (AI model requirements)
  calculatedWidth = Math.floor(calculatedWidth / 16) * 16;
  calculatedHeight = Math.floor(calculatedHeight / 16) * 16;
  return { width: calculatedWidth, height: calculatedHeight };
};
// Replace loading spinner with the actual image
const updateImageCard = (index, imageUrl) => {
  const imgCard = document.getElementById(`img-card-${index}`);
  if (!imgCard) return;
  imgCard.classList.remove("loading");
  imgCard.innerHTML = `<img decoding="async" class="result-img" src="${imageUrl}" alt="${imageUrl}">
                <div class="img-overlay">
                  <a href="${imageUrl}" class="img-download-btn" title="Download Image" download>
                    <i class="fa-solid fa-download"></i>
                  </a>
                </div>`;
};
// Send requests to Hugging Face API to create images
const generateImages = async (selectedModel, imageCount, aspectRatio, promptText) => {
  const MODEL_URL = `https://api-inference.huggingface.co/models/${selectedModel}`;
  const { width, height } = getImageDimensions(aspectRatio);
  generateBtn.setAttribute("disabled", "true");
  // Create an array of image generation promises
  const imagePromises = Array.from({ length: imageCount }, async (_, i) => {
    try {
      // Send request to the AI model API
      const response = await fetch(MODEL_URL, {
        method: "POST",
        headers: {
          Authorization: `Bearer ${API_KEY}`,
          "Content-Type": "application/json",
          "x-use-cache": "false",
        },
        body: JSON.stringify({
          inputs: promptText,
          parameters: { width, height },
        }),
      });
      if (!response.ok) throw new Error((await response.json())?.error);
      // Convert response to an image URL and update the image card
      const blob = await response.blob();
      updateImageCard(i, URL.createObjectURL(blob));
    } catch (error) {
      console.error(error);
      const imgCard = document.getElementById(`img-card-${i}`);
      imgCard.classList.replace("loading", "error");
      imgCard.querySelector(".status-text").textContent = "Generation failed! Check console for more details.";
    }
  });
  await Promise.allSettled(imagePromises);
  generateBtn.removeAttribute("disabled");
};
// Create placeholder cards with loading spinners
const createImageCards = (selectedModel, imageCount, aspectRatio, promptText) => {
  galleryGrid.innerHTML = "";
  for (let i = 0; i < imageCount; i++) {
    galleryGrid.innerHTML += `
      <div class="img-card loading" id="img-card-${i}" style="aspect-ratio: ${aspectRatio}">
        <div class="status-container">
          <div class="spinner"></div>
          <i class="fa-solid fa-triangle-exclamation"></i>
          <p class="status-text">Generating...</p>
        </div>
      </div>`;
  }
  // Stagger animation
  document.querySelectorAll(".img-card").forEach((card, i) => {
    setTimeout(() => card.classList.add("animate-in"), 100 * i);
  });
  generateImages(selectedModel, imageCount, aspectRatio, promptText); // Generate Images
};
// Handle form submission
const handleFormSubmit = (e) => {
  e.preventDefault();
  // Get form values
  const selectedModel = modelSelect.value;
  const imageCount = parseInt(countSelect.value) || 1;
  const aspectRatio = ratioSelect.value || "1/1";
  const promptText = promptInput.value.trim();
  createImageCards(selectedModel, imageCount, aspectRatio, promptText);
};
// Fill prompt input with random example (typing effect)
promptBtn.addEventListener("click", () => {
  const prompt = examplePrompts[Math.floor(Math.random() * examplePrompts.length)];
  let i = 0;
  promptInput.focus();
  promptInput.value = "";
  // Disable the button during typing animation
  promptBtn.disabled = true;
  promptBtn.style.opacity = "0.5";
  // Typing effect
  const typeInterval = setInterval(() => {
    if (i < prompt.length) {
      promptInput.value += prompt.charAt(i);
      i++;
    } else {
      clearInterval(typeInterval);
      promptBtn.disabled = false;
      promptBtn.style.opacity = "0.8";
    }
  }, 10); // Speed of typing
});
themeToggle.addEventListener("click", toggleTheme);
promptForm.addEventListener("submit", handleFormSubmit);
Step-by-Step Guide to Get Hugging Face API Key
Step 1: Sign Up or Log In
Go to https://huggingface.co
Click Sign Up (if new) or Log In (if you already have an account).
Step 2: Go to Your Account Settings
Once logged in:
Click your profile picture in the top-right corner.
Select “Settings” from the dropdown.
Step 3: Go to Access Tokens
On the left sidebar:
Click “Access Tokens”
Or go directly to: https://huggingface.co/settings/tokens
Step 4: Create a New Token
Click “New token”.
Give it a name like:
AI Image GeneratorChoose “Read” access level (this is sufficient for inference).
Click “Generate”
Step 5: Paste the Token in Your JavaScript
In your main.js file, replace:
const API_KEY = "PASTE-YOUR-API-KEY";
Testing, Debugging, and Final Touches
Before launching your AI-powered image creation tool, it’s time to test, debug, and polish your code. Start by checking if all features work: input field, API call, image rendering, dark mode, and responsiveness.
Use browser developer tools (F12) to check for console errors and network issues. Test the app across different devices and browsers to ensure consistency. If any fetch API in JavaScript requests fail, inspect the headers and payload for errors.
You can also add final touches like animations, transitions, or placeholder messages. Maybe add a message like “Start typing a prompt to generate AI art” in the image area when it’s empty. It enhances usability.
Consider hosting your AI image generator frontend project on GitHub Pages, Netlify, or Vercel. Add a favicon, meta tags, and social sharing links for professionalism. These details make a huge difference in presentation — especially if you’re sharing the project in your portfolio or blog.
By the end of testing, you’ll have a stable, visually appealing, and fully functional JavaScript image generator. Now it’s ready to be used, showcased, or improved upon.
Conclusion
Congratulations — you’ve just built a fully functioning AI image generator using HTML, CSS, and JavaScript. Not only did you learn how to use the Hugging Face API for image generation, but you also created a sleek, responsive text to image generator JavaScript app that’s fun and practical.
This project is more than just a cool experiment. It’s a solid portfolio piece that demonstrates your skills in creative coding with AI, frontend development, and JavaScript API integration. Plus, it introduces you to AI image API usage — a valuable area in today’s tech market.
So what’s next? You can expand this app by:
- Adding user login and save features
- Offering multiple model selections (like anime or pixel styles)
- Integrating social sharing or image download functionality
This journey opens the door to more AI art generators and creative tools. You’ve proven that even complex tasks like AI image generation are within reach with modern web tools.
So keep coding, keep exploring, and keep building awesome things. Because with the right mix of AI and code, the only limit is your imagination.
Recent Posts


Categories

FAQs
What is an AI Image Generator?
An AI Image Generator is a tool that uses artificial intelligence to create images based on text prompts. These tools rely on deep learning models like Stable Diffusion or DALL·E to turn words into visuals automatically.
Can I build an AI Image Generator using HTML, CSS, and JavaScript?
Yes, you can! While HTML and CSS handle the structure and design, JavaScript allows you to integrate APIs like Hugging Face to generate images from user input.
What API should I use for text-to-image generation?
The Hugging Face API is a great option. It offers access to models like Stable Diffusion and supports text-to-image synthesis with simple JavaScript fetch() requests.
Is this project suitable for beginners in web development?
Absolutely. This is a beginner-friendly project that introduces you to JavaScript API integration, responsive design, and working with real AI services — all using basic web technologies.
Do I need a backend for this AI image generator?
No backend is required. This project is fully client-side, meaning all image generation is done via API calls directly from the browser using JavaScript.
Is it free to use Hugging Face’s API for image generation?
Hugging Face offers a free tier with limited API calls per month. It’s more than enough for testing and personal projects. You can upgrade if you need more capacity.
How do I make my AI image generator mobile-friendly?
Use responsive design techniques in CSS — like media queries, flexible grids, and scalable fonts — to ensure the app looks and works great on all screen sizes.
Can I use this project in my portfolio?
Yes! It’s a standout HTML CSS JavaScript project that demonstrates creativity, technical ability, and knowledge of AI integration — a big plus for any frontend developer’s portfolio.
Can I generate different image styles like anime or 3D?
Yes, you can modify your API to use different models hosted on Hugging Face. Some models specialize in anime, sketches, or 3D styles — just choose the one that suits your needs.
What’s the next step after building this project?
After finishing your AI image generator, you can enhance it with features like user login, image downloads, prompt history, or share-to-social options. Or move on to more advanced AI art generator projects!
Share on Social Media
Related Articles

Advanced BMI Calculator: Accurate Body Mass Index & Health Insights
Discover how an Advanced BMI Calculator provides accurate, personalized health insights by considering age, gender, body fat, and more.

CSS Animation Generator – Create Stunning Animations Without Coding Skills
Discover how a CSS animation generator helps you design smooth, professional animations without coding. Learn features, benefits, tips, and integration

Build a Fully Responsive Sidebar with Dropdown Menu – HTML, CSS & JS
Learn how to build a fully responsive sidebar with dropdown menus using HTML, CSS, and JavaScript. Step-by-step guide with code